Vue.js Fundamentals
vue 소개
MVVM패턴의 ViewModel 레이어에 해당하는 View단 라이브러리
- 데이터 바인딩과 화면 단위를 컴포넌트 형태로 제공하며, 관련 API를 지원하는데에 궁극적인 목적이 있음
- Angular에서 지원하는 2way data bindings을 동일하게 제공
- 하지만 Component 간 통신의 기본 골격은 React의 1 Way Data Flow(부모 -> 자식)와 유사
- Virtual DOM을 이용한 렌더링 방식이 React와 거의 유사
- 다른 Front-End FW(Angular, React)와 비교했을 때 훨씬 가볍고 빠름
- 간단한 Vue를 적용하는데 있어서도 러닝커브가 낮고, 쉽게 접근 가능
Hello Vue.js
// index.html body 태그 안에
<div id="app">
    {{ message }}
</div>
<script src="https://unpkg.com/vue@2.3.3"></script>
<script>
    new Vue({
        el:'#app',
        data:{
            message: 'Hello Vue.js!'
        }
    })
</script>
MVVM 패턴
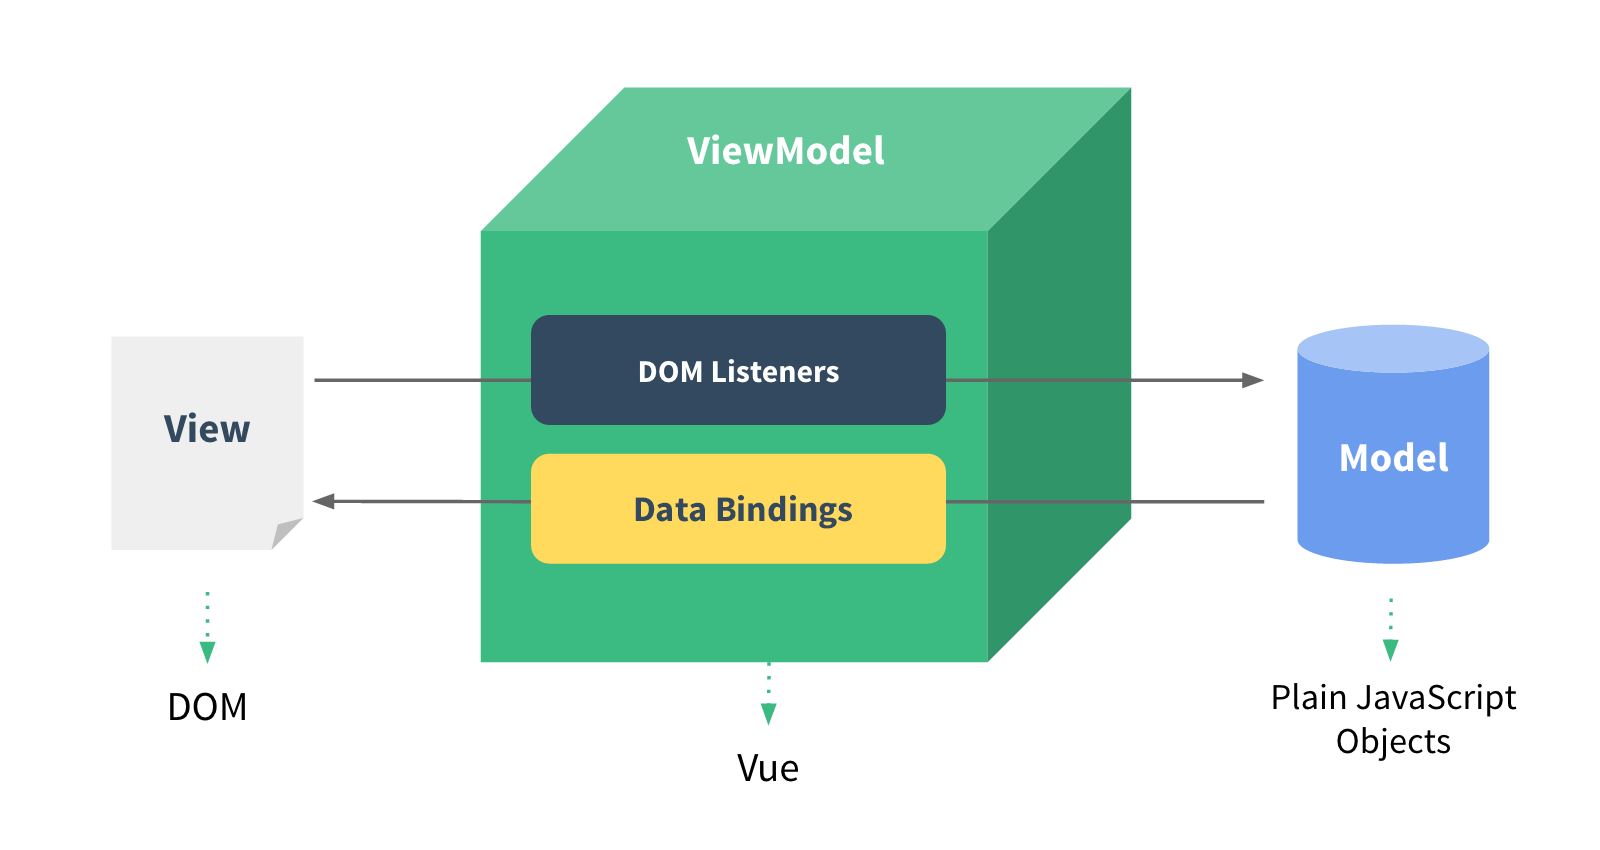 Backend 로직과 Client의 마크업 & 데이터 표현단을 분리하기 위한 구조로 전통적인 MVC패턴의 방식에서 기인하였다.
간단하게 생각해서 화면 앞단의 화면 동작 관련 로직과 뒷단의 DB 데이터 처리 및 서버 로직을 분리하고, 뒷단에서 넘어온 데이터를 Model에 담아 View로 넘어주는 중간 지점이라고 보면 되겠다.
Backend 로직과 Client의 마크업 & 데이터 표현단을 분리하기 위한 구조로 전통적인 MVC패턴의 방식에서 기인하였다.
간단하게 생각해서 화면 앞단의 화면 동작 관련 로직과 뒷단의 DB 데이터 처리 및 서버 로직을 분리하고, 뒷단에서 넘어온 데이터를 Model에 담아 View로 넘어주는 중간 지점이라고 보면 되겠다.
참고링크
instance
Vue.js를 이용해서 UI화면을 개발하기 위해서는 아래 절차를 따른다.
- Vue.js 라이브러리를 로딩했을 때 존재하는 Vue 생성자로 인스턴스를 생성해야 한다.
// vm 은 ViewModel 을 뜻한다. (관행적인 코딩 컨벤션) var vm = new Vue({ // options }) - 위를 풀어서 얘기하면 Vue 라이브러리 로딩 후 접근 가능한
Vue라는 기존 객체에, 화면에서 사용할 옵션(데이터, 속성, 메서드, 등등)을 포함하여 화면의 단위를 생성한다 라고 보면 되겠다. - Vue 객체를 생성할 때 아래와 같이 data, template, el, methods, life cycle callback 등의 options을 포함할 수 있다.
var vm = new Vue({
    template: ...,
    el: ...,
    methods:{

    },
    created:{

    }
    // ...
})
instance lifecycle
 Vue 객체가 생성될 때 아래의 초기화 작업을 수행한다.
- 데이터 관찰
- 템플릿 컴파일
- DOM 에 객체 연결
- 데이터 변경시 DOM 업데이트 이 초기화 작업 외에도 개발자가 의도하는 커스텀 로직을 아래와 같이 추가할 수 있다.
var vm = new Vue({
    data:{
        a:1
    },
    created:function(){ // created 훅은 인스턴스가 생성된 후에 호출됩니다
        // this는 vm을 가리킴
        console.log('a is: '+this.a)
    }
})
이 외에도 라이프싸이클 단계에 따라 아래 메서드를 사용할 수 있다.
- mounted
- updated
- destroyed 위와 같이 초기화 메서드로 커스텀 로직을 수행하기 때문에 Vue 에서는 따로 Controller를 갖고 있지 않다.
components
 화면에 비춰지는 뷰의 단위를 쪼개어 재활용이 가능한 형태로 관리하는 것이 컴포넌트
<div id="app">
    <button>parent component</button>
    <my-component></my-component>
</div>
<script src="https://unpkg.com/vue@2.3.3"></script>
<script>
    Vue.component('my-component',{
        template: '<div>A custom component!</div>'
    });
    new Vue({
        el:'#app',
    })
</script>
- global component
Vue.component('my-component',{ // ... }); - local component
var cmp = {
    data : function(){
        return {
            // ...
        };
    },
    template:'<div>A custom component!!!</div>',
    methods:{}
}
new Vue({
    el:'#app',
    components:{
        'my-component' : cmp
    }
})
templates
Vue 로 그리는 화면의 요소들, 함수, 데이터 속성을 모두 Templates 안에 포함된다.
- Vue 는 DOM 의 요소와 Vue 인스턴스를 매핑할 수 있는 HTML Template 을 사용
- Vue 는 Template으로 렌더링 할 때 Virtual DOM을 사용하여
- DOM 조작을 최소화하고 렌더링을 꼭 다시 해야만 하는 요소를 계산하여 성능 부하를 최소화
- 원하면 render function 을 직접 구현하여 사용할 수 있음
- Attributes : HTML Attributes 를 Vue 의 변수와 연결할 때는
v-bind를 이용<div v-bind:id="dynamicId"></div> - JS Expressions :
안에 다음과 같이 javascript 표현식도 가능하다.<div>{{ number + 1 }}</div><!-- O --> <div>{{ message.split('').reverse().join('') }}</div><!-- O --> <div>{{ if (ok) { return message} }}</div><!-- X --> - Directives :
v-접두사를 붙인 attributes로, javascript 표현식으로 값을 나타내는게 일반적이다.:을 붙여 인자를 받아 취급할 수 있다.<p v-if="seen">Now you see me</p> <!-- : 뒤에 선언한 href 인자를 받아 url 값이랑 매핑 --> <a v-bind:href="url"></a> <!-- click 이라는 이벤트를 받아 Vue에 넘겨준다. --> <a v-on:click="doSomething"></a> - Filters : 화면에 표시되는 텍스트의 형식을 편하게 바꿀 수 있도록 고안된 기능이며,
|을 이용하여 여러 개의 필터를 적용할 수 있다.<!-- message에 표시될 문자에 capitalize 필터를 적용하여 첫 글자를 대문자로 변경한다. --> {{ message | capitalize }}new Vue({ //... filters:{ capitalize:function(value){ if(!value) return '' value = value.toString() return value.charAt(0).toUpperCase() + value.slice(1) } } })
props
components communication
부모와 자식 컴포넌트 관계
구조상 상-하 관계에 있는 컴포넌트의 통신은
- 부모 -> 자식 : pass props
- 자식 -> 부모 : emit events
모든 컴포넌트는 각 컴포넌트 자체의 스코프를 갖는다.
- ex) 하위 컴포넌트가 상위 컴포넌트의 값을 바로 참조할 수 없는 형식
상위에서 하위로 값을 전달하려면 props 속성을 사용한다.
<div id="app">
    <child-component v-bind:passed-data="message"></child-component>
</div>
<script src="https://unpkg.com/vue@2.3.3"></script>
<script>
    Vue.component('child-component',{
        props:['passedData'],
        template:'<p>{{ passedData }}</p>'
    });
    var app = new Vue({
        el:'#app',
        data:{
            message : 'hello vue! from parent component'
        }
    })
</script>
주의 할점 : js에서 props 변수 명명을 카멜 기법으로 하면 html에서 접근은 케밥 기법(-)으로 가야한다. 같은 레벨의 컴포넌트 간 통신은 불가능하며, 부모를 통해 통신해야 한다.
<div id="app">
    <todo-item v-bind:todo="todo" v-for="todo in Todos" :key="todo.id"></todo-item>
</div>
<script src="https://unpkg.com/vue@2.3.3"></script>
<script>
    var cmp = {
        props:['todo'],
        template:'<p>{{ todo.text }}</p>'
    };

    var app = new Vue({
        el:'#app',
        data:{
            Todos:[
                {id:0, text:'learn vue'},
                {id:0, text:'learn js'},
                {id:0, text:'learn html'},
                {id:0, text:'learn css'}
            ]
        },
        components:{
            'todo-item': cmp
        }
    })
</script>
event emit
이벤트 발생은 컴포넌트의 통신 방법 중 하위 컴포넌트에서 상위 컴포넌트로 통신하는 방식이다.
이벤트 발생 코드 형식
// 하위 컴포넌트의 내용
this.$emit('이벤트 명');
<!-- 상위 컴포넌트의 템플릿 -->
<div id="app">
  <child-component v-on:이벤트 명="상위 컴포넌트의 실행할 메서드 명 또는 연산"></child-component>
</div>
// 버튼을 클릭하면 'hello' 에서 'thankyou' 로 바뀌게 하기
<div id="app">
    <p>{{ message }}</p>
    <child-component v-on:refresh="refreshpage"></child-component>
</div>
<script src="https://unpkg.com/vue@2.3.3"></script>
<script>
    Vue.component('child-component', {
        template: '<button v-on:click="clickBtn">emit event</button>',
        methods: {
            clickBtn: function() {
                this.$emit('refresh', 'thankyou');
            }
        }
    });

    var app = new Vue({
        el: '#app',
        data: {
            message: 'hello'
        },
        methods:{
            refreshpage:function(value){
                this.message = value;
            }
        }
    });
</script>
vue-router
뷰 라우터는 뷰 라이브러리를 이용하여 싱글 페이지 애플리케이션을 구현할 때 사용하는 라이브러리입니다. 화면이 전환될 때 전환되는 행위를 라우트라고 한다.
여기서 잠깐
각 페이지는 주소에 따라 식별되는데 이것을 라우팅이라고 한다.
라우팅하는 주체는 서버가 될 수도 있고
브라우저가 될 수도 있다.
서버가 라우팅 하는 것을 서버 라우팅이라고 하고,
브라우저가 라우팅 하는 것을 브라우저 라우팅이라고 한다.

서버 라우팅 - 매번 주소를 요청할 때마다 화면이 갱신된다.

브라우저 라우팅 - 주소를 매번 요청하더라도 화면이 갱신되지 않는다.
대신에 화면에 필요한 데이터만 서버에 따로 요청해서 화면을 갱신하는 방법을 사용한다.
브라우저 라우팅이 서버 라우팅에 비해 장점은 좀더 효율적으로 화면을 갱신한다.

브라우저 라우팅의 예로 트렐로 사이트를 들 수 있다.https://trello.com
트렐로 사이트에 들어가서 개발자화면 Network XHR에 필터를 걸고 새로고침해서 살펴보자.
백엔드단에 API를 호출하고 있다. 의심가는 API를 클릭하고 Preview를 살펴보자.

이렇게 브라우저 라우팅은
주소 요청시 라우팅을 브라우저에서 처리하고
데이터는 백엔드 API를 통해서 서버로부터 받아온 뒤에
마지막으로 그 데이터를 이용해 화면에 뿌리는 구조이다.

브라우저에서 동작하는 Vue.js는 이 라우팅 기능을 수행할 수 있다.
단순한 라우팅 시작하기
/* main.js */
import Vue from 'vue'
import App from './App.vue'

const Login = { template: '<div>Login Page</div>'}

const routes = {
  '/':App,
  '/login':Login
}

new Vue({
  el:'#app',
  computed:{
    VueComponent(){
      return routes[window.location.pathname] || {template: '<div>Page not found</div>'}
    }
  },
  render(h){    // 화면에 그리는 함수
    return h(this.VueComponent)
  }
})
뷰 라우터 설치
프로젝트에 뷰 라우터를 설치하는 방법은 CDN 방식과 NPM 방식 2가지가 있습니다.
CDN 방식
<script src="https://unpkg.com/vue-router/dist/vue-router.js">
<div id="app">
    <h1>Hello Vue Router!</h1>
    <p>
        <router-link to="/foo">Go to Foo</router-link>
        <router-link to="/bar">Go to Bar</router-link>
    </p>
    <router-view></router-view>
</div>
<script src="https://unpkg.com/vue@2.3.3"></script>
<script src="https://unpkg.com/vue-router/dist/vue-router.js"></script>
<script>
    // 1. Define route components.
    var Foo = {
        template: '<div>foo</div>',
        name: 'Foo'
    };
    var Bar = {
        template: '<div>bar</div>',
        name: 'Bar'
    };
    // 2. Create the router instance and pass the `routes` option, Define some routes
    var router = new VueRouter({
        mode: 'history',
        routes: [
            { path: '/foo', component: Foo },
            { path: '/bar', component: Bar }
        ]
    })
    // 3. Create and mount the root instance.
    var app = new Vue({
        el:'#app',
        router: router
    }).$mount('#app')
</script>
NPM 방식
npm install vue-router
기본적인 예제
vue-cli 3.x
npm i vue-router
/* main.js */
import Vue from 'vue'
import App from './App.vue'
import VueRouter from 'vue-router'

Vue.use(VueRouter)

// 1. Define route components.
const Login = { template: '<div>Login</div>' }
const NotFound = { template: '<div>NotFound</div>' }

// 2. Define some routes
const routes = [
  { path: '/', component: App },
  { path: '/login', component: Login },
  { path: '*', component: NotFound },
]

// 3. Create the router instance and pass the `routes` option
const router = new VueRouter({
  mode:'history',
  routes // short for `routes: routes`
})

new Vue({
    el:'#app',
    router,
    render: h => h({template: '<router-view></router-view>'}),
})
/* App.vue*/
<template>
  <div id="app">
    여기부터
  </div>
</template>

<script>
export default{
  name: 'app',
  data(){
    return {

    }
  }
}
</script>

<style>
</style>
/* vue.config.js project root에 놓는다.*/
module.exports = {
    runtimeCompiler: true
}
기본적인 예제 리팩토링
vue-cli 3.x, 라우터 인스턴스로 리팩토링
/* main.js */
import Vue from 'vue'
import router from './router'

new Vue({
  router,
  render: h => h({template: '<router-view></router-view>'}),
}).$mount('#app')
/* src/router/index.js */
import Vue from 'vue'
import VueRouter from 'vue-router'
import App from '../App.vue'

Vue.use(VueRouter)

// 1. Define route components.
const Login = { template: '<div>Login</div>' }
const NotFound = { template: '<div>NotFound</div>' }

// 2. Define some routes
const routes = [
  { path: '/', component: App },
  { path: '/login', component: Login },
  { path: '*', component: NotFound },
]

// 3. Create the router instance and pass the `routes` option
const router = new VueRouter({
  mode:'history',
  routes // short for `routes: routes`
})

export default router
- Vue 라우터는 기본적으로 RootUrl'/#/'{Router name}의 구조로 되어 있다.
example.com/#/user - 여기서
#태그 값을 제외하고 기본 URL 방식으로 요청 때마다 index.html을 받아 라우팅을 하려면const router = new VueRouter({ routes, //아래와 같이 history 모드를 추가해주면 된다. mode:'history' })
Nested Routers
- 라우터로 화면 이동시 Nested Routers를 이용하여 여러개의 컴포넌트를 동시에 렌더링할 수 있다.
- 렌더링 되는 컴포넌트의 구조는 가장 큰 상위의 컴포넌트가 하위의 컴포넌트를 포함하는
Parent-Child형태와 같다.<!-- localhost:5000 --> <div id="app"> <router-view></router-view> </div> <!-- localhost:5000/home --> <!-- parent component --> <div> <p>Main Component rendred</p> <!-- child component--> <app-header></app-header> </div>
<div id="app">
    <h1>Hello Vue Nested Router!</h1>
    <p>
        <router-link to="/login">Go to Login</router-link>
        <router-link to="/list">Go to List</router-link>
    </p>
    <router-view></router-view>
</div>
<script src="https://unpkg.com/vue@2.3.3"></script>
<script src="https://unpkg.com/vue-router/dist/vue-router.js"></script>
<script>
    // 1. Define route components.
    var Login = {
        template: `
            <div>
                Login Section
                <router-view></router-view>
            </div>
        `,
    };
    var LoginForm = {
        template: `
            <form action="/" method="post">
                <div>
                    <label for="account">email: </label>
                    <input type="email" id="account">
                </div>
                <div>
                    <label for="pw">password: </label>
                    <input type="password" id="pw">
                </div>
            </form>
        `,
    };
    var List = {
        template: `
            <div>
                List Section
                <router-view></router-view>
            </div>
        `,
    };
    var ListItems = {
        template:`
            <ul>
                <li>1</li>
                <li>2</li>
                <li>3</li>
            </ul>
        `,
    };
    // 2. Create the router instance and pass the `routes` option, Define some routes
    var router = new VueRouter({
        mode: 'history',
        routes: [
            {
                path: '/login',
                component: Login,
                children:[
                    { path:'', component:LoginForm }
                ]
            },
            {
                path: '/list',
                component: List,
                children:[
                    { path:'', component:ListItems }
                ]
            }
        ]
    })
    // 3. Create and mount the root instance.
    var app = new Vue({
        router: router
    }).$mount('#app')
</script>
주의사항 - Vue Template Root Element
- Vue의 Template에는 최상위 태그가 1개만 있어야 렌더가 가능하다.
- 여러 개의 태그를 최상위 태그 레벨에 동시에 위치시킬 수 없음
- 따라서 최상위 Element는 한개만 지정해야 한다.
// 에러 발생
var Foo = {
    template:`
        <div>foo</div>
        <router-view></router-view>
    `,
}
// div 태그 안에 텍스트와 'router-view' 포함하여 정상 동작
var Foo = {
    template:`
        <div>
            foo
            <router-view></router-view>
        </div>
    `,
}
Named Views
- 라우터로 특정 URL로 이동시, 해당 URL에 해당하는 여러개의 View(컴포넌트)를 동시에 렌더링 한다.
- 각 컴포넌트에 해당하는
name속성과router-view지정 필요
<div id="app">
    <router-view name="nestedHeader"></router-view>
    <router-view></router-view>
</div>
{
    path: '/home',
    // named router
    components:{
        nestedHeader: AppHeader,
        default:Body
    }
}
Nested View vs Named Views?
- 특정 URL에서 1개의 컴포넌트에 여러 개의 하위 컴포넌트를 갖는 것을 Nested Routes
- 특정 URL에서 여러 개의 컴포넌트를 쪼개진 뷰 단위로 렌더링 하는 것을 Named View
axios
Axios는 node.js와 브라우저를 위한 Promise 기반 HTTP 클라이언트입니다.
서버사이트에서는 네이티브 node.js의 http 모듈을 사용하고,
클라이언트(브라우저)에서는 XMLHttpRequests를 사용합니다.
JSON 데이터로 자동 변환합니다.
axios 설치
CDN 방식
<script src="https://unpkg.com/axios/dist/axios.min.js"></script>
NPM 방식
npm install axios
axios 예제
import axios from 'axios';

axios.get('/user?ID=1234')
.then(response => console.log(response))
.catch(error => console.error(error));

axios.get('/user',{
    params:{ID:12345}
})
.then(response => console.log(response))
.catch(error => console.error(error));

async function getUser(){
    try{
        const response = await axios.get('/user?ID=12345');
        console.log(response);
    }catch(error){
        console.error(error);
    }
}